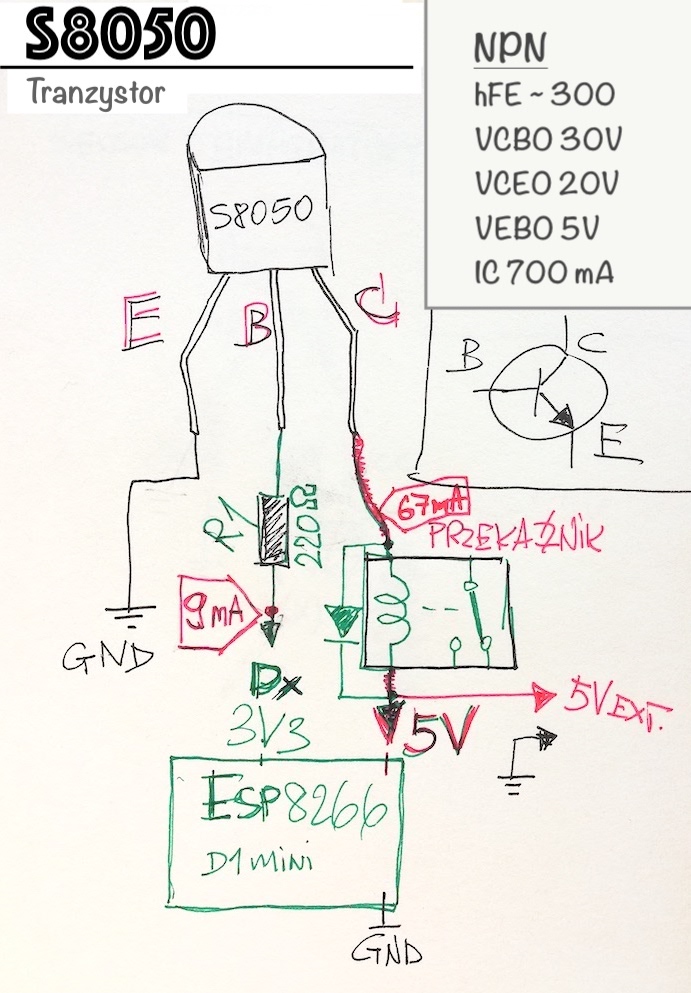
Żeby ESP8266 włączył przekaźnik mocy HF115F potrzebny jest tranzystor jako przełącznik. Przekaźnik bierze w czasie włączenia ok. 70 mA. Użyłem tranzystora S8050. Działa świetnie, oto schemat podłączenia. Przekaźnik jest przełączny. Podłączyłem tak, że napięcie pojawiające się na cewce odcina na stykach 230V. Układ będzie zamontowany pod gniazdkiem w pokoju żony. Nie trzeba już będzie wracać szybko do domu, żeby sprawdzić czy na pewno żelazko zostało wyłączone.
SCHEMAT

KOD
/*************************************************************
  This example shows how to synchronize Button widget
  and physical button state.

  App project setup:
    Button widget attached to V2 (Switch mode)
 *************************************************************/

/* Comment this out to disable prints and save space */
#define BLYNK_PRINT Serial

#include <ESP8266WiFi.h>
#include <BlynkSimpleEsp8266.h>
#include "config2.h" // dodatkowy plik konfiguracyjny

//// You should get Auth Token in the Blynk App.
//// Go to the Project Settings (nut icon).
//char auth[] = "";
//// Your WiFi credentials.
//// Set password to "" for open networks.
//char ssid[] = "";
//char pass[] = "";

// Set your LED and physical button pins here
const int ledPin = D2;
const int btnPin = D6;

BlynkTimer timer;
void checkPhysicalButton();

int ledState = LOW;
int btnState = HIGH;

// Every time we connect to the cloud...
BLYNK_CONNECTED() {
  // Request the latest state from the server
  Blynk.syncVirtual(V2);

  // Alternatively, you could override server state using:
  //Blynk.virtualWrite(V2, ledState);
}

// When App button is pushed - switch the state
BLYNK_WRITE(V2) {
  ledState = param.asInt();
  digitalWrite(ledPin, ledState);
}

void checkPhysicalButton()
{
  if (digitalRead(btnPin) == LOW) {
    // btnState is used to avoid sequential toggles
    if (btnState != LOW) {

      // Toggle LED state
      ledState = !ledState;
      digitalWrite(ledPin, ledState);

      // Update Button Widget
      Blynk.virtualWrite(V2, ledState);
    }
    btnState = LOW;
  } else {
    btnState = HIGH;
  }
}

void setup()
{
  // Debug console
  Serial.begin(9600);

  Blynk.begin(auth, ssid, pass);
  // You can also specify server:
  //Blynk.begin(auth, ssid, pass, "blynk-cloud.com", 80);
  //Blynk.begin(auth, ssid, pass, IPAddress(192,168,1,100), 8080);

  pinMode(ledPin, OUTPUT);
  pinMode(btnPin, INPUT_PULLUP);
  digitalWrite(ledPin, ledState);

  // Setup a function to be called every 100 ms
  timer.setInterval(100L, checkPhysicalButton);
}

void loop()
{
  Blynk.run();
  timer.run();
}
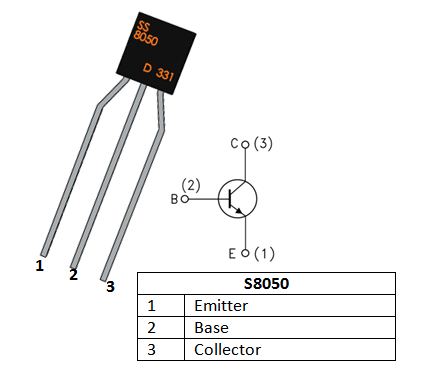
TRANZYSTOR

DIODA
Dioda 1N0007 lub podobna. Katoda (-) z paskiem na obudowie.
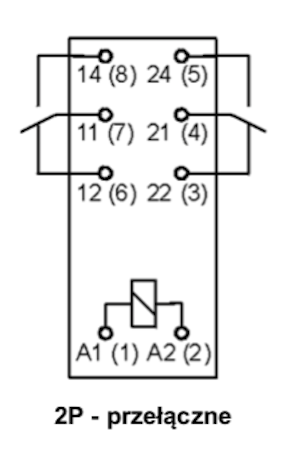
PRZEKAŹNIK
Widok z dołu:

Karta katalogowa:
