
Źródło: Arduino to ESP8266 Data With Serial Communication Using Arduino IDE
Transmisja Szeregowa (Serial Communication) to łatwy sposób na rozszerzenie możliwości współpracy ESP8266 z większą ilością czujników, nRF24, wyświetlaczy itp. Albo też rozszerzenie możliwości dowolnej płytki Arduino o moduł sieciowy ESP8266. Jak zwykle ACROBOTIC wykonało świetną robotę, dodatkowo posługując się formatem Json przy przesyłaniu danych.
W DynamicJsonDocument() należy podać wielkość pamięci dynamicznej, która pomieści naszą strukturę. Przydatny jest do tego kalkulator:
Pamiętać trzeba żeby wpisać właściwą formę naszej struktury Json
{
   "type": "response",
   "light": 200,
   "temp": -50.3,
   "hum": 100.0
 }
ACROBIOTIC
O kilku rzeczach trzeba tu pamiętać:
- Po pierwsze konieczne jest zainstalowanie biblioteki ArduinoJson w wersji 6+. Wersje starsze nie będą działać.
- Po drugie nie wolno łączyć TX z RX obu płytek przed załadowaniem programów. U mnie powodowało to przedziwne informacje o errorach. Jeśli mamy podłączone inne płytki przez USB, które wysyłają informacje przez Serial, też lepiej je odłączyć przy wysyłaniu skeczy.
- Pamiętać też należy aby połączyć komputer z siecią WiFi zanim wpiszemy numer strony na którym wyświetlają się dane. Ja zapomniałem, bo mam sieć na kablu i było trochę nerwów.
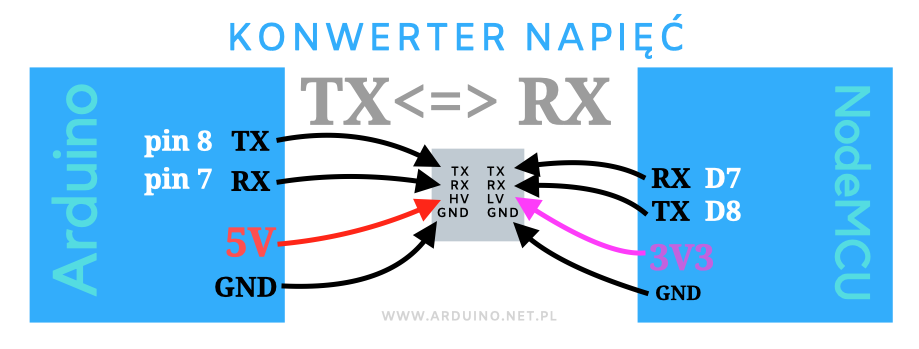
Tak łączymy platformy:
TX <-> RX
RX <-> TX
LINKI
- HOW TO SERIAL COMMUNICATION BETWEEN NODE MCU AND ARDUINO
- https://github.com/yarogniew/serial_connection/tree/master/Serial_dwie_strony/
- Arduino : Connecting Arduino UNO with ESP8266 / bardzo prosty sposób komunikacji
- Arduino dokumentacja: Serial
- arduinojson.org
- #152 Additional ESP32 Serial Channels in Arduino IDE (Quickie) by Andreas Spiess
Źródło: Arduino : Connecting Arduino UNO with ESP8266
Proste połączenie Arduino z ESP8266 przez serial (łączymy D3 Arduino z RX NodeMCU8266), wykorzystujące format Json, ale bez biblioteki. Płytki połączyłem przez moduł obniżający napięcie, ale można też bez, podobno ESP8266 wytrzymuje 5V na RX.
Nadajnik
#include <SoftwareSerial.h>
SoftwareSerial sw(2, 3); // RX, TX

int id=12;

void setup() {
 Serial.begin(115200);
 Serial.println("Interfacfing arduino with nodemcu");
 sw.begin(115200);
}

void loop() {
 Serial.println("Sending data to nodemcu");
 int adc=analogRead(A0);
 Serial.print("{\"sensorid\":");
 Serial.print(id);//sensor id
 Serial.print(",");
 Serial.print("\"adcValue\":");
 Serial.print(adc);//offset
 Serial.print("}");
 Serial.println();

 sw.print("{\"sensorid\":");
 sw.print(id);//sensor id
 sw.print(",");
 sw.print("\"adcValue\":");
 sw.print(adc);//offset
 sw.print("}");
 sw.println();
 delay(5000);
}
Odbiornik
void setup() {
  Serial.begin(115200);
}

void publishSerialData(char *serialData) {
  Serial.println(serialData);
}

void loop() {
  //client.loop();
  if (Serial.available() > 0) {
    char bfr[101];
    memset(bfr, 0, 101);
    Serial.readBytesUntil( '\n', bfr, 100);
    //Serial.println(bfr);
    publishSerialData(bfr);
  }
}
Połączenie w obie strony z Json
Łącząc kody HOW TO SERIAL COMMUNICATION BETWEEN NODE MCU AND ARDUINO z ACROBOTIC napisałem taki program, który używa połączenia szeregowego korzystając z biblioteki ArduinoJson v 6.0 :
Arduino part:
/*
  bismillah hir rahman nir raheem
  UNO/Nano = Pin 7 & Pin 8
  Note: Uno and ESP8266 cross connection
  https://github.com/acrobotic/Ai_Tips_ESP8266/tree/master/esp8266_arduino_comm
*/

#include <SoftwareSerial.h>
#include <millisDelay.h>
#include <ArduinoJson.h>

#define rx 7
#define tx 8

SoftwareSerial ArduinoUno(rx, tx); // RX, TX
millisDelay sendIt;

String f, g;
int i, j;

void setup() {
  Serial.begin(9600);
  pinMode(rx, INPUT);
  pinMode(tx, OUTPUT);
  ArduinoUno.begin(9600);

  sendIt.start(5000);
}

void loop() {
  delay(100);
  //=============== RX ==============

  String content = "";
  boolean messageReady = false;
  while (messageReady == false) { // blocking but that's ok
    while (ArduinoUno.available()) {
      content = ArduinoUno.readString();
    }
    messageReady = true;
  }
  if (content != "") {
    Serial.println();
    Serial.println(content);

    DynamicJsonDocument doc(1024);
    DeserializationError error = deserializeJson(doc, content);
    if (error) {
      Serial.print(F("deserializeJson() failed: "));
      Serial.println(error.c_str());
      messageReady = false;
      return;
    }
    serializeJsonPretty(doc, Serial);
    Serial.println();

  }

  //=============== TX ==============

  if (sendIt.isFinished()) {
    sendIt.repeat();

    DynamicJsonDocument doc(1024);
    doc["temp"] = 99.99;
    doc["hum"] = 88.88;
    doc["light"] = 198;
    doc["batt"] = 3.33;
    serializeJson(doc, ArduinoUno);

    Serial.println("Wysłano dane do NodeMCU");
    Serial.println();
  }
}
ESP8266 part:
/*
  bismillah hir rahman nir raheem
  ESP8266 = Pin D7 & Pin D8
  Note: Uno and ESP8266 cross connection
  https://github.com/acrobotic/Ai_Tips_ESP8266/tree/master/esp8266_arduino_comm
*/

#include <SoftwareSerial.h>
#include <ESP8266WiFi.h>
#include <millisDelay.h>
#include <ArduinoJson.h>

millisDelay sendIt;

#define rx D7
#define tx D8

SoftwareSerial NodeMCU(rx, tx); //RX, TX

String f;

void setup() {
  Serial.begin(9600);
  NodeMCU.begin(9600);
  pinMode(rx, INPUT);
  pinMode(tx, OUTPUT);

  sendIt.start(4000);
}

void loop() {
  delay(100);
  //=============== RX ==============
  String content = "";
  boolean messageReady = false;
  while (messageReady == false) { // blocking but that's ok
    while (NodeMCU.available()) {
      content = NodeMCU.readString();
    }
    messageReady = true;
  }
  if (content != "") {
    Serial.println();
    Serial.println(content);
    Serial.println();

    DynamicJsonDocument doc(1024);
    DeserializationError error = deserializeJson(doc, content);
    if (error) {
      Serial.print(F("deserializeJson() failed: "));
      Serial.println(error.c_str());
      messageReady = false;
      return;
    }
    serializeJsonPretty(doc, Serial);
    Serial.println();
  }

  //=============== TX ==============

  if (sendIt.isFinished()) {
    sendIt.repeat();
    //    long i = (700000L);
    //    f = "z" + String(i);
    //    NodeMCU.println(f);
    //delay(100);
    DynamicJsonDocument doc(1024);

    doc["z"] = 700000L;
    serializeJson(doc, NodeMCU);
    Serial.println("Wysłano dane do Arduino");
    Serial.println();

  }
}