
[Wpis z 2021 roku, edytowany]
Nabyłem niedawno czujnik natężenia światła BH1750. Działa dobrze, biblioteka ma kilka przykładów stosowania czujnika. Od kilku dni testuję.
Arduino
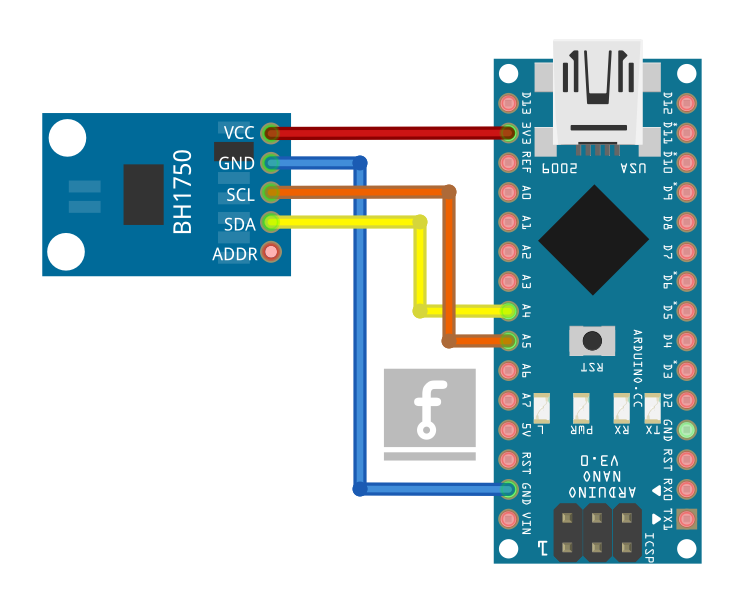
ŁĄCZENIE
Klasyczne I2C. Dodatkowo pin do zmiany adresu. Szczegóły https://github.com/claws/BH1750.
Kod dla Arduino
/*

Example of BH1750 library usage.

This example initialises the BH1750 object using the default high resolution
continuous mode and then makes a light level reading every second.

Connections

  - VCC to 3V3 or 5V
  - GND to GND
  - SCL to SCL (A5 on Arduino Uno, Leonardo, etc or 21 on Mega and Due, on
    esp8266 free selectable)
  - SDA to SDA (A4 on Arduino Uno, Leonardo, etc or 20 on Mega and Due, on
    esp8266 free selectable)
  - ADD to (not connected) or GND

ADD pin is used to set sensor I2C address. If it has voltage greater or equal
to 0.7VCC voltage (e.g. you've connected it to VCC) the sensor address will be
0x5C. In other case (if ADD voltage less than 0.7 * VCC) the sensor address
will be 0x23 (by default).

*/

#include <BH1750.h>
#include <Wire.h>

BH1750 lightMeter;

void setup() {
  Serial.begin(9600);

  // Initialize the I2C bus (BH1750 library doesn't do this automatically)
  Wire.begin();
  // On esp8266 you can select SCL and SDA pins using Wire.begin(D4, D3);
  // For Wemos / Lolin D1 Mini Pro and the Ambient Light shield use
  // Wire.begin(D2, D1);

  lightMeter.begin();

  Serial.println(F("BH1750 Test begin"));
}

void loop() {
  float lux = lightMeter.readLightLevel();
  Serial.print("Light: ");
  Serial.print(lux);
  Serial.println(" lx");
  delay(1000);
}
MicroPython
Łączenie oczywiście jak wyżej dla Arduino. Ja łączyłem z moim nowym mikroprocesorem ESP32C3 Super Mini, a w tym przypadku (tak jak z raspberry pico) zmieniamy I2C: sda=Pin(8), scl=Pin(9). Użyłem prostej biblioteki pico-bh1750. Pisana była pod pico właśnie, ale po lekkiej modyfikacji programu głównego, działa z ESP32C3. Jak pewnie z innymi mikroprocesorami esp32 czy esp8266. Trzeba tylko pamiętać, by zmienić piny sda i scl. Podstawowy kod podaję niżej. Są bardziej skomplikowane biblioteki BH1750, ale ja potrzebuję prostego odczytywania światła na zewnątrz i ten mi działa. Do VCC czujnika podłączyłem 5V z zewnątrz. 5V zasila też ESP32C3 Super Mini.
Kod dla MicroPython
from machine import Pin, SoftI2C
from utime import sleep

from bh1750 import BH1750

i2c0 = SoftI2C(sda=Pin(8), scl=Pin(9))

bh1750 = BH1750(0x23, i2c0)

while True:
    print(bh1750.measurement)
    sleep(1)
LINKI
- Czujnik natężenia światła GY-302 – BH1750, wyście I2C do Arduino – ABC-RC.PL
- Biblioteka dla Arduino
- Biblioteka dla MicroPython